How to Farm QUICK on QuickSwap – The Simple Guide
- This article will teach you how to take advantage of one of the most lucrative liquidity mining programs on the market right now, while saving money on transaction fees.
- We will take you through the strange but fascinating world of multiple network bridges and AMM quirks so you can have a seamless experience using the Layer-2 based exchange.

Shutterstock
Table of Contents
As confusing as Ethereum scaling is, from ETH 2.0 and sharding to zero-knowledge-snarks, optimistic snarks, and various sidechain-based layer two solutions, user experience can turn out to be surprisingly satisfying once you are familiar with a few simple concepts. This article will teach you everything you need to know about Polygon-based QuickSwap and the ecosystem surrounding it, so you can farm liquidity mining reward tokens on the layer two exchange.
Introduction to QuickSwap
To anyone familiar with Uniswap and SushiSwap, QuickSwap will instantly look familiar; the project is a fork of UniSwap, and so the user interface is identical to that of its predecessor. What’s different is the underlying backend — instead of using Ethereum’s main layer for all of the computation and transactions, QuickSwap is based on Polygon (formerly Matic).
Polygon is a second-layer solution which uses a modified version of Plasma to achieve low transaction costs, almost instant finality, and high throughput. These long-awaited features of the sidechain are being passed to the projects built on top of them, making sure that QuickSwap transactions cost next to nothing in network fees. In addition, users no longer have to spend time waiting for their transactions to finalise due to gas price spikes.
In fact, thanks to a 0.1 MATIC airdrop, fees on QuickSwap are essentially free for the time being, removing one of the largest adoption obstacles that Ethereum-based AMM-s are facing.
Introduction to QUICK Tokens
As is the case for almost every other automated market maker out there, QuickSwap also has its own token — QUICK. Again, in a manner similar to that of competitors, QUICK is a governance token, and the majority of tokens will be distributed to the community — in the case of QUICK 90% is dedicated to liquidity mining, and another 5% was airdropped to UNI holders.
Liquidity mining rewards are planned to last for four years; every day 986 QUICK tokens are being distributed to liquidity providers on the platform. At the time of writing the first important QUICK governance vote is on the way. If it passes, QUICK tokens will not only serve as governance tokens, but will also allow their holders to claim a portion of the trading fees on the network.
How QuickSwap Works
QuickSwap is an automated market maker meaning it allows for trading of assets (in our case ERC-20 tokens) without the use of the limit order books that traditional exchanges provide. Instead, similarly to other smart-contract based alternatives, it uses pre-filled token pools for liquidity, and prices are algorithmically determined by the balance ratio between the two assets in a pool.
Users can seamlessly switch one token for another, provided that there is enough liquidity available. The swap is subject to a liquidity provider fee, which for QuickSwap is 0.3% (the industry standard). As is the case with most competing AMMs, the lion’s share of profit for liquidity providers does not come from fees. Instead, the DEX has its own lucrative liquidity mining program.
How to Farm QUICK Tokens on QuickSwap
The process is remarkably similar to that of SushiSwap’s SUSHI farming:
- You choose a liquidity pool based on thorough research of crypto assets and careful analysis of your financial situation
- You purchase the necessary cryptocurrencies
- You install and set up MetaMask
- You move your assets to the Polygon sidechain
- You add liquidity to the pool you have chosen
- You stake your liquidity provider tokens
Selecting a Liquidity Pool
Not every liquidity pool on the network has the privilege of being a QUICK token recipient. The annual percentage yield (APY) of pools is also not equal between pools. For a full list of subsidised pools and their reward rates, you can check out this page. By dividing the daily reward rate of a pool with the value of all of the deposited tokens in it you can determine which ones offer the most rewards per deposited dollar.
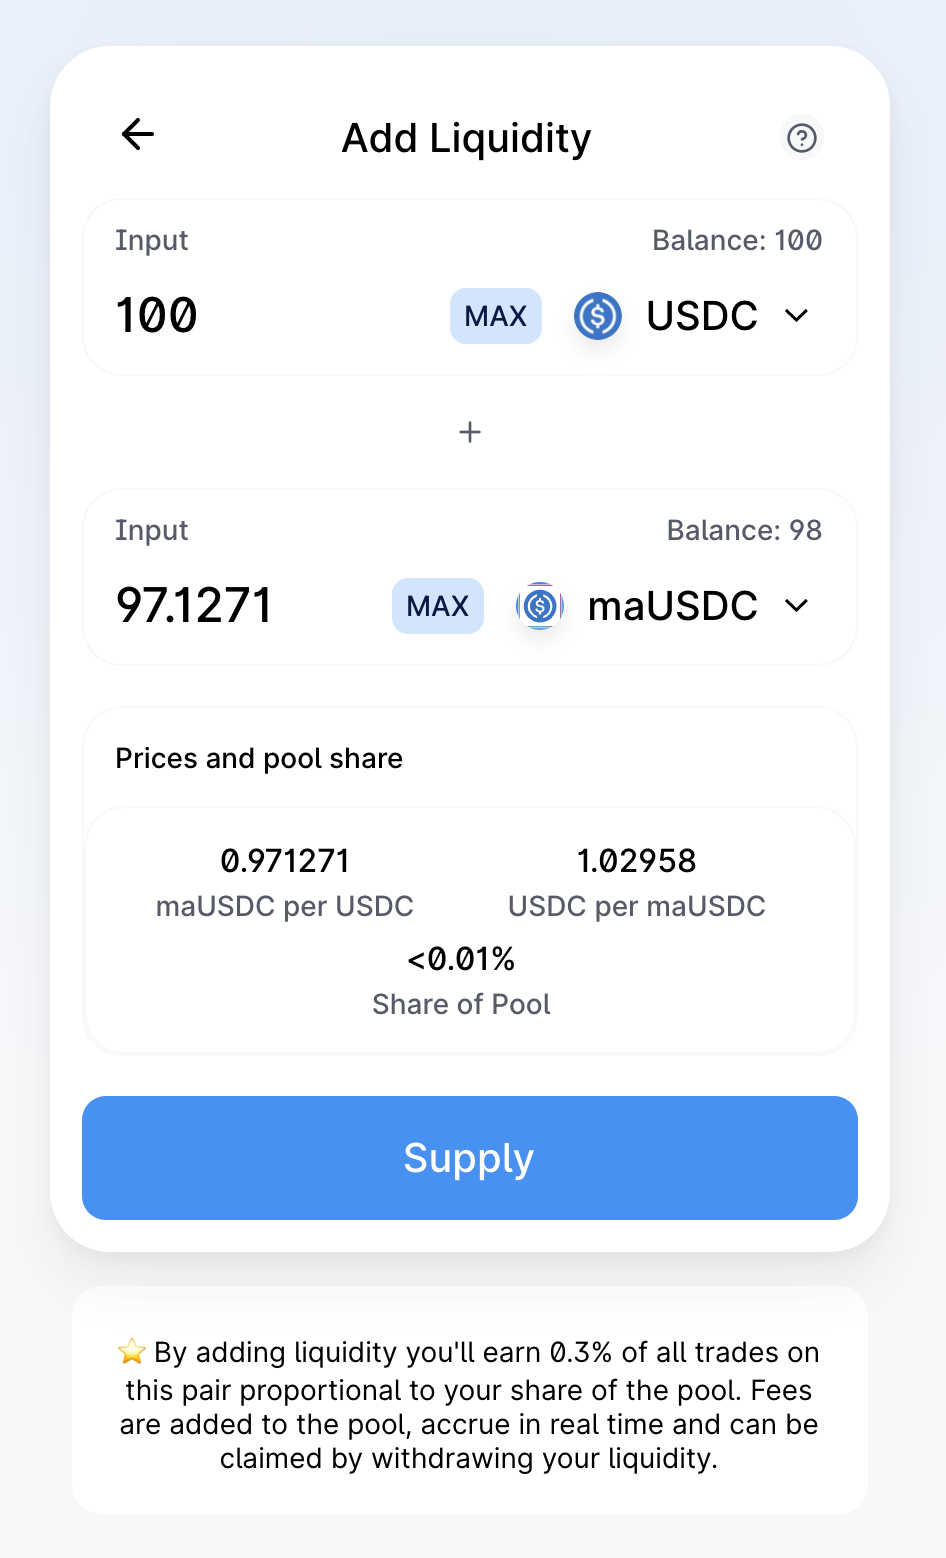
Then again, it should be noted that the risk is also not evenly distributed between the pools. The USDC-maUSDC pool is almost guaranteed to retain its dollar value (as long as the Circle-founded stablecoin remains pegged to the dollar) and impermanent loss will be minimal (only due to the slow price appreciation of maUSDC).
Meanwhile, a pool based on two volatile tokens carries significantly higher risk of both token price depreciation and impermanent loss. Therefore your choice of liquidity pool should not be based on APY alone. Always make sure your decisions are well-informed.
Buying Cryptocurrency
If you don’t already have crypto assets at hand, you will have to purchase some. The platforms we recommend are the following:
Choose the best option depending on your physical location and payment preference; follow this guide to learn how to purchase cryptocurrency on any of these platforms. Once you acquire the needed assets, send them to your MetaMask.
Since you will be needing at least two different assets to take advantage of liquidity mining, keep in mind that you do not need to purchase both of them. In fact, due to the somewhat high cost of moving assets through the Ethereum L1 Polygon bridge, sometimes it might be cheaper to buy just one of them, move it to Polygon, and then swap it on QuickSwap for the second asset.
We will cover the Polygon bridge shortly. In the meantime you can easily check how much the second option would cost you in slippage rate and liquidity provider fees if you simply head on over to the Swap page, enter your desired “From” and “To” cryptoassets, and the amount that you will be swapping.

Then it should be trivial to compare the estimated received amount and the minimum received amount with what you can get from the order book on a centralised exchange.
Installing & Setting up MetaMask
Follow this guide to install and set up MetaMask, and to learn your way around the extension. Make sure you are well-informed about the security implications and always double check addresses so you don’t risk losing your assets to a typo. Once you are comfortable with the plugin you can proceed further.
Before we move on to the next step, your MetaMask plugin should also be configured to support the Matic network. In order to achieve that you need to open the plugin, click the network selection dropdown that is located at the top of the pop-up, click Custom RPC and enter the following details:
- Network name: Matic
- New RPC URL: https://rpc-mainnet.maticvigil.com/
- Chain ID: 137
- Currency Symbol: MATIC
- Block Explorer URL: https://explorer.matic.network/
Now we are ready to transfer our assets to the second layer scaling solution.
Moving Assets to Polygon
This is the first step which differs from conventional liquidity mining on layer one. If you want to take advantage of the low fees and quick finality that Polygon (and in turn QuickSwap) provides, you will need to move your assets to the proper network.
For the majority of crypto tokens, the switch can happen through the Bridge on the Matic web wallet.

Always make sure you have the correct bridge selected, otherwise your funds might get stuck on the wrong network for more than a week. At present, this is approximately the withdrawal period for the Plasma exit mechanism.
Don’t forget that transferring funds through the bridge is not free — in fact at times of ETH layer 1 network congestion it is not even close to being cheap. Fees are not static, so make sure you check how much it would cost you to transfer your funds, and whether you should do so in two separate transactions for the two tokens, or whether it would be cheaper to send in one of the tokens, and buy the second one once you have already moved to the Polygon network.
Moving Aave Interest Bearing Tokens
At the time of writing, the Matic web wallet bridge does not support the transition of Aave interest bearing tokens. This is due to a complication with the interest generation mechanism. Fortunately, an alternative solution has been developed, and there is a second bridge you can utilise for the purpose.
That bridge is Aavegotchi and it supports a number of ERC-20 tokens, including GHST, DAI, USDC, aUSDC, aDAI, aWETH, aAAVE, aLINK, aTUSD, aUSDT, aUNI, and aYFI. Despite the unconventional user interface you are presented with, the mechanism of transferring assets is identical.

The only difference you should keep in mind is that unlike the main ETH network where Aave interest bearing tokens increase in quantity as you are earning interest, on Matic, the token itself increases in value — which is why the Aave interest bearing versions of USD-pegged stablecoins on Matic will usually be priced above one dollar.
In order to avoid confusion you should also remember that these tokens will change their name after they’ve arrived on the other side of the bridge to better reflect the difference in functionality (since technically they are different tokens); aUSDC will become maUSDC and the rest of them will receive their “m” prefix likewise.
Also, keep in mind that you might need to wait for up to 30 minutes after your transaction is confirmed before you ever see your funds on the other side.
Adding Liquidity to a Pool
From this point on, the following steps are trivial to anyone who has used Uniswap or one of its clones.
You go to the Pool page. You click on “Add Liquidity” and you choose your two tokens. You select the quantity you want to add to the liquidity pool, submit the transaction and within a few seconds your funds will be deposited and available to see on the Pool page.
Sometimes you might stumble upon a bug that does not allow the page to automatically refresh, showing your deposited capital. Refreshing the page manually will fix that.
Staking Liquidity Tokens
The final step is just as trivial. Once your cryptoassets are successfully deposited in a liquidity pool, you will have received LP tokens that can be staked.
To do so, we hop in to the next tab — QUICK. We find the subsidised pool that we have money in and we click Manage.
This will open a new page. If no liquidity has been provided yet, you will see an “Add Liquidity” button that will redirect you to the previous step. However if you’ve successfully gone through every single step so far, you will see a Deposit button. Clicking it opens a modal dialog where you can choose the quantity of LP tokens you want to deposit (usually that’s all of them). You click MAX or you select your desired amount, you send the transaction, and voilà — you’re already farming QUICK tokens.

As you can see immediately afterwards, opening this same page can also show you how many QUICK tokens you have farmed so far. Usually, it would automatically update, unless there is a browser plugin preventing that. Now all that is left is for you to enjoy your gains, and if you are in for some additional work, you might be interested in optimising your yields and increasing your profits.
QuickSwap Peculiarities
Despite being a Uniswap fork, and despite using the same user interface, QuickSwap has a few quirks that even experienced liquidity miners might want to be aware of.
If you have skipped the previous sections because you believe you have enough knowledge of liquidity mining in general, you might want to go back to the “Moving Assets to Polygon” section above, since the presence of two separate bridges for different ERC-20 tokens might confuse you. There, you will also learn the differences between Ethereum Mainnet Aave interest bearing tokens and their Matic counterparts.
In addition, very few people know how to truly manage their funds while liquidity mining. Farming tokens might feel profitable enough, but if you don’t know how often to withdraw funds and when to sell and reinvest you might be getting half the APY that is available to you. If that is the case I strongly recommend reading our guide on APY optimisation. This is especially true for users of QuickSwap, because in the absence of transaction fees users should be encouraged to reinvest their earned tokens more frequently.
Another important fact is that subsidised liquidity pools on QuickSwap change every week. On top of the listed pools on the QUICK page you will see a timer, showing the remaining time in which the pools and their respective rewards will remain the same. Once the timer expires the pool of your choosing might not be in the list of those mining QUICK anymore. Even if it is, your daily rewards might have changed, prompting a reevaluation of your farming strategy.
And even if the pool is still on the list, you will still need to manually restake your LP tokens as we have shown you in the “Staking Liquidity Tokens” section. As a matter of fact, the earlier you do, the better, since sometimes the first hour of the new week brings more profit than the last day of the previous week — since very few people are diligent about this action, and at the start of the week some of the pools are almost empty.
And last but not least — if you are holding your QUICK tokens, you might want to stay informed about QUICK governance and your ability to participate in it. At present, voting takes place on Snapshot.org, but I would highly encourage you to keep track of your investments, and follow the project on Twitter as well.
- The Solana Foundation, Polygon Labs, and Input Output Global (IOG) all made public statements over the past few days, claiming that their tokens were not securities.
- The U.S. SEC filed lawsuits against Binance and Coinbase last week, claiming they had offered unregistered securities on their platforms, and naming 16 digital assets as securities.


U.S. Securities and Exchange Commission building, Washington DC, USA, 25 June 2018. Shutterstock
- Decentralized finance (DeFi) has become one of the hottest trends in the crypto world as it’s more transparent and decentralized than traditional finance.
- Here are our top picks of DeFi projects that have a good potential growth, and some of the protocols that did not made the list, such as RING Financial.
- Binance has officially launched its $1 billion industry recovery fund, and said it is ready to set aside another $1 billion in the near future “if the need arises”.
- Jump Crypto, Polygon Ventures, Aptos Labs, Animoca Brands, GSR, Kronos, and Brooker Group have all joined the fund with a combined contribution of $50 million.